Endpoint Manager by ITarian: on-premise solution
Endpoint Manager by ITarian (EM) for stand alone installation. Basic features described on official site https://dm.comodo.com/
Os types support:
- Windows
- OS X
- Linux
- iOS
- Android
Features
- Device management
- Remote packages installation
- Antivirus protection
- Management groups and users
- Management configuration templates
- File logs / activity / verdict management
- Remote tools (file / process explorer)
- Remote control
- Remote procedure and monitoring
- Wipe Apple and Android devices
- Update CCC and CCS agents from internal cache in order to optimize internet bandwidth and accelerate updates in large networks.
ITarian on-premise solution is distributed as set of docker images and can be run with docker. Therefore it is main requirement to have operation system with support and pre-installed docker
To make it works together for numerous docker-container it is used docker-compose tool
It allows easily setup all components together and maintain already run environment
- Installs Docker and Docker Compose, and checks/fixes common system requirement issues (e.g.
vm.max_map_count) - Walks through domain and SSL certificate configuration with live field validation
- Deploys and configures all services with a single guided flow
- Provides a status page to monitor service health and container logs
- Applies future version upgrades with a single click, once a new release is available
See the Installer page for the full walkthrough with screenshots.
Scheme of docker-compose usage:
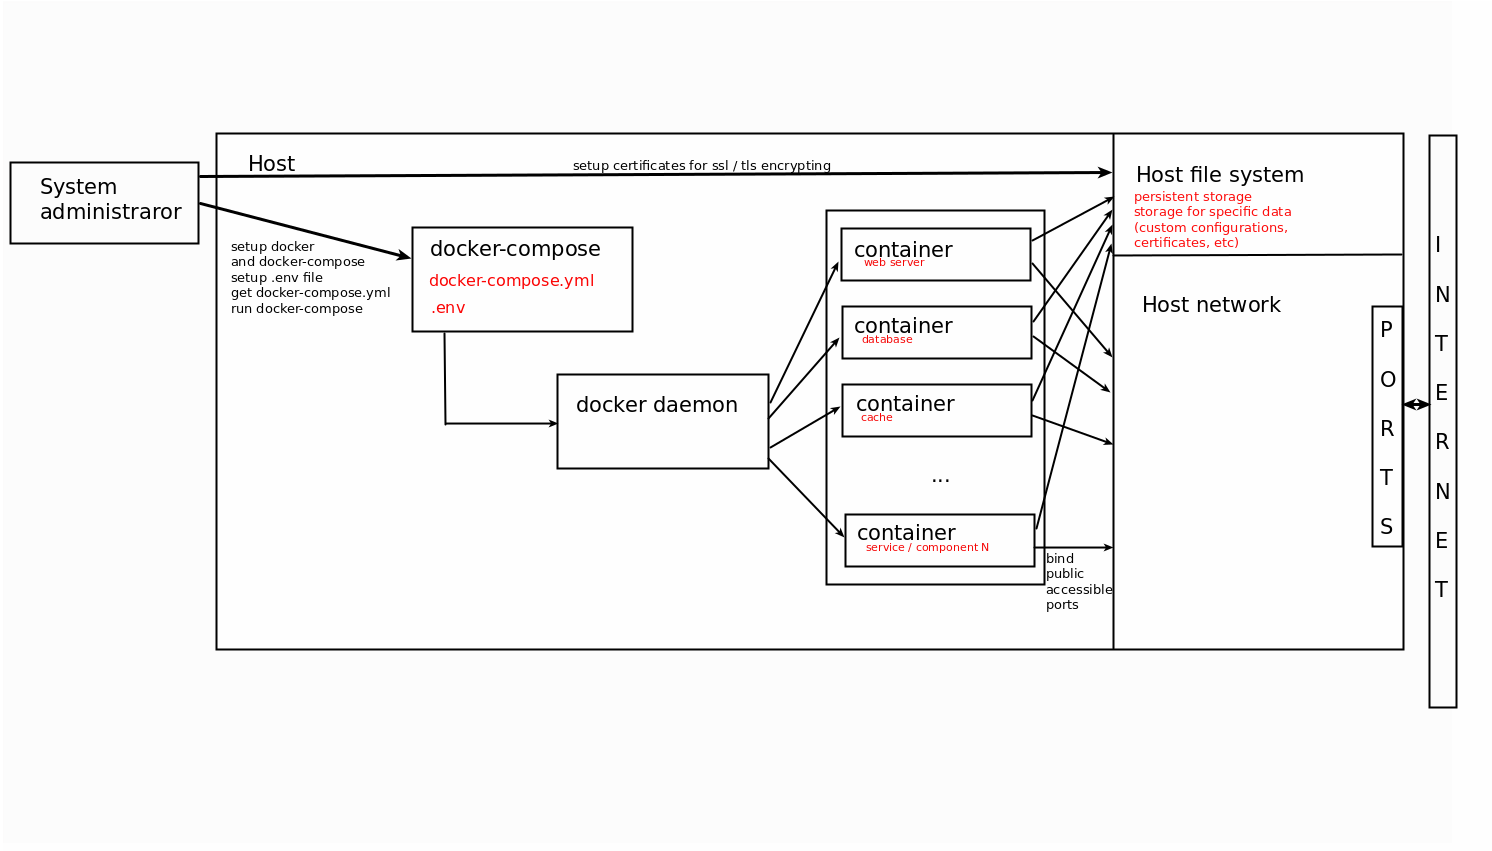
Docker-compose supports stand alone configuration for single server. It is applicable for limited count
of endpoints (up to 1000).
For larger deployments, database components (Elasticsearch, PostgreSQL, MongoDB) can be placed on
dedicated nodes — see Installer V2's multi-node deployment support.
For scalable solution to manage multiple servers and horizontally scalable and reliable system need to
use more complicated docker management system like a Kubernetes
At the moment support of kubernetes for on-premise solution is under the development and not supported
Minimum 2 servers for docker-compose configuration
Hardware requirements / recommendations (1000 endpoints)
By statistics: 1 endpoint produces 0.015 requests per second
It means that we can handle about 65 sequential requests from different endpoints per seconds.
Server could handle 50-100 connections simultaneously.
Therefore average endpoint count that can be handled is 50 * 65 > 3000.
ITSM-server
8 Cores Cpu | 8 Gb Ram | 100 Gb Hdd
Xmpp-server
4 Cores Cpu | 4 Gb Ram | 40 Gb Hdd
On-premise installation consists of multiple services and components which are communicated between themselves via network
Public listen ports:
ITSM Server
- 80 HTTP - web port (by default redirect to https 443 port) used only for making available default browser connection without https
- 443 HTTP(S) - common port which handle all incoming connections with TLS encryption
Xmpp Server
- 443 TCP - secured tcp connection for endpoints and remote control tools
- 5222 TCP - default xmpp port with the same purposes but not used. Might be used as a fallback option for 443
- 8080 HTTP - service port for sending push messages. It used only by ITSM server and could be closed for external connections
Turn server
- 49152 - 65535 UDP - range of ports dynamically allocated for remote control connections to endpoints which located behind the NAT
Private network
Besides public ports most services expose specific ports to internal network which is closed to external world. These ports could be exposed just for debug purposes, but by default all service ports are closed including databases, message brokers and microservices which are the part of all system.
ITSM system designed for most restricted environments with corporate networks which has almost fully closed network
Therefore it only expose 443 port as main secure channel
Port 80 used only for convenient redirects as most popular default web port for each domain
For these purposes it was discovered also 443 port as default for xmpp connections to XMPP-server, but with difference to use TCP traffic instead of HTTP
Summarize it we need to have open 443 port on firewall as a minimum requirement. Port 80 also is recommended to open as it might confusing users and reduce usability
-
During installation process next host are required to be available from server:
-
Private docker registry hosts:
- registry.on-premise.itarian.com
- auth.on-premise.itarian.com
- get-compose.on-premise.itarian.com - On-premise release configuration
- get.on-premise.itarian.com - On-premise installer tool
-
Dockerhub public registry (for mongo, postgres, rabbitmq) hosts:
- registry-1.docker.io
- auth.docker.io
- hub.docker.com
- productioncloudflare.docker.com
-
Private docker registry hosts:
-
From On-Premise server side access to following host is required:
- accounts.comodo.com
-
From endpoint side access to following hosts is required:
- mdmsupport.cmdm.comodo.com
- mdmsupport.itsm-us1.comodo.com
- fls.security.comodo.com
- valkyrie.comodo.com
- download.comodo.com
- cdn.download.comodo.com
General tests held on Ubuntu Desktop and Ubuntu Server (Ubuntu 22.04.1 LTS).
Main software requirement is docker (version 25 or above) with compose plugin (version 2.24 and
above).
NOTE: Docker will be installed automatically by our installer tool in case using actual version of
operating system.
For docker-compose configuration it doesn't matter which hostname is specified for each server.
Itsm requires several domain names which should be resolved by different components.
Expected that there are exists domain name and it could be resolved everywhere. Otherwise we have to
specify each required subdomain on every endpoint according to infrastructure.
Basic dns domain should be set by customer. But there are few requirements for existing domains /
subdomains.
List of required domains:
- Base domain
- Itsm-domain
- Xmpp-domain
- Rmm-domain
- Patch-Management-domain
- Audit-log-domain
- Download-domain
- RealtimeDeviceCommunication-API-domain
- RealtimeDeviceCommunication-Relay-domain
- BulkInstallationPackage-domain
Base domain is just a pointer for all another subdomains.
Small example:
                ITSM-server IP    10.0.5.1
                XMPP-server IP  10.0.5.2
Assume we have itsm domain on-prem.company.local on IP 10.0.5.1 (itsm-server).
It means that base domain is company.local (doesn't matter which ip it has. This entry not used in the system).
Next subdomains must be related to base domain.
Rmm-domain - rmm-api.company.local (IP 10.0.5.1 same as itsm-server)
Patch-Management-domain - plugins-api.company.local (IP 10.0.5.1 same as itsm-server)
Audit-log-domain - auditlogs-api.company.local (IP 10.0.5.1 same as itsm-server)
Download-domain - dl.company.local (IP 10.0.5.1 same as itsm-server)
Xmpp-domain - xmpp.company.local (IP 10.0.5.2 XMPP-server)
RealtimeDeviceCommunication-API-domain - rtdc-api.company.local (IP 10.0.5.1 same as itsm-server)
RealtimeDeviceCommunication-Relay-domain - rtdc-relay-01.company.local (IP 10.0.5.1 same as itsm-server)
BulkInstallationPackage-domain - bip.company.local (IP 10.0.5.1 same as itsm-server)
Required subdomain list which should be resolved:
From ITSM-server
- xmpp (to XMPP-server)
From XMPP-server
- <itsm> - customer specified ITSM_DOMAIN (to itsm-server)
From administrator endpoint (web access)
- <itsm> - customer specified ITSM_DOMAIN (to itsm-server)
- rtdc-api (to itsm-server)
- rtdc-relay-01 (to itsm-server)
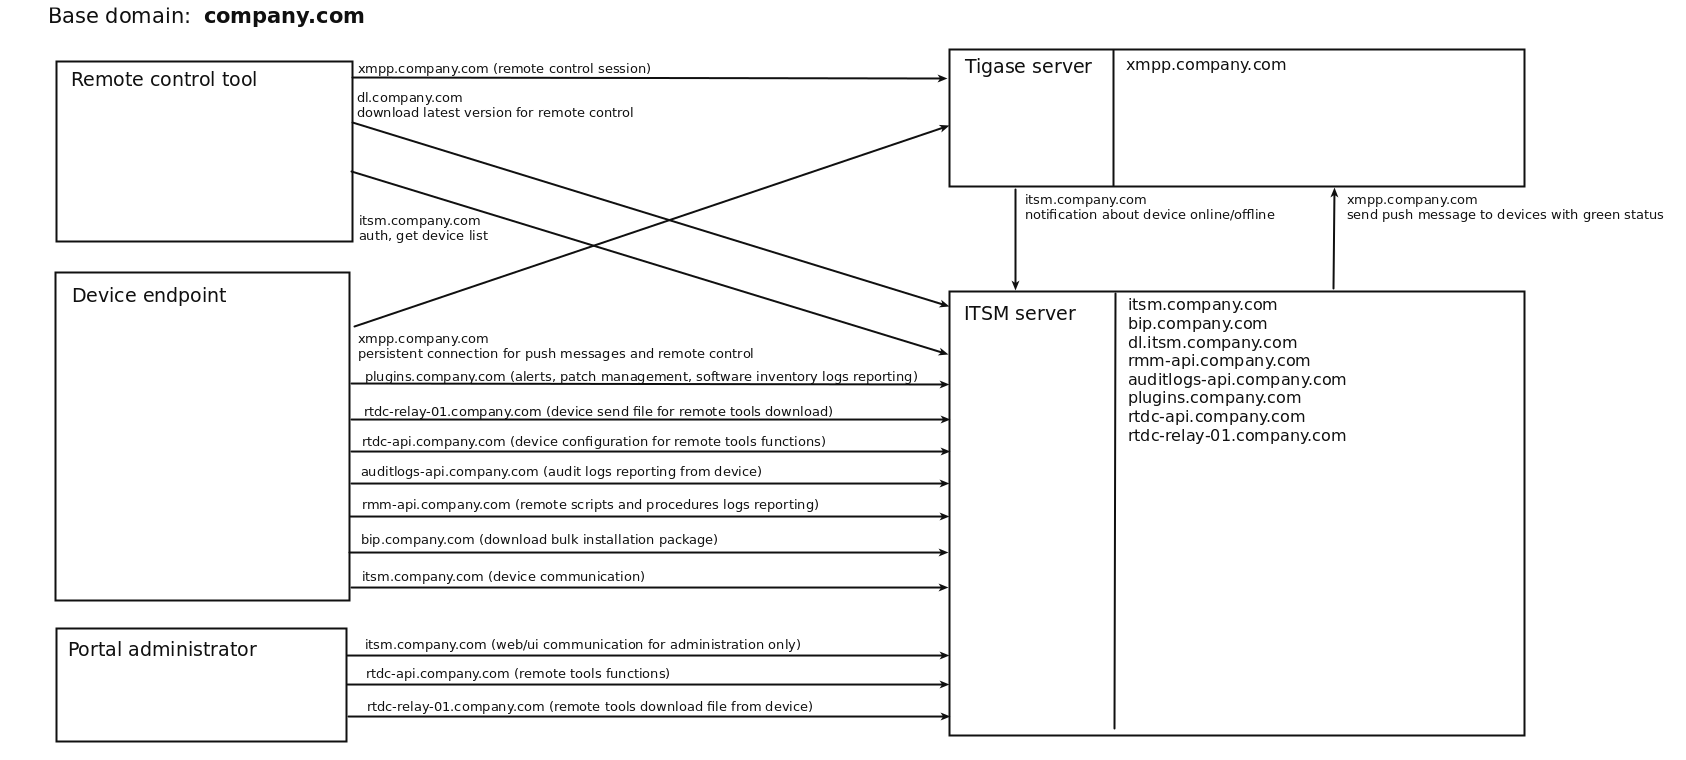
From enrolled device endpoint
- <itsm> - customer specified ITSM_DOMAIN (to itsm-server)
- bip - bulk installation package download host (to itsm-server)
- rmm-api - rmm logs reporting (to itsm-server)
- auditlogs-api - audit logs reporting (to itsm-server)
- rtdc-api - remote tools configuration (to itsm-server)
- rtdc-relay-01 - remote tools download file (to itsm-server)
- plugins - alerts, patch management, software inventory logs reporting (to itsm-server)
- xmpp - persistent connection for receiving push messages and remote control commands (to XMPP-server)
From remote control tool
- <itsm> - customer specified ITSM_DOMAIN (to itsm-server)
- dl - check and download updates (to itsm-server)
- xmpp - remote control communication (to XMPP-server)
Scheme example:
We recommend to have wildcard certificate. You may to have certificates for each subdomain specified
above.
Currently required to have wildcard ssl certificate for itsm-server *.company.local and the same
certificate or specific one for XMPP xmpp.company.local.
If you don’t have real domain and trusted SSL certificate you can generate self-signed certificates by
yourself.
Note: endpoints couldn’t work with self-signed certificate on XMPP. In this case you have never get
green online status on itsm-server for endpoints also remote control will not work.
For minimal configuration it is required to have set of certificates and keys for each server (itsm, xmpp)
- Validates the uploaded certificate against the configured domain and its expiry date
- Accepts both X.509 and PKCS certificate types, converting between them as needed
- Places certificates in the correct location automatically for both server types — ITSM and XMPP
SMTP is required for the ITSM server to send email (notifications, enrollment invites, reports, etc.).
SMTP is configured via environment variables in the docker-compose .env file, not from the portal UI:
ITSM_SMTP_HOST
ITSM_SMTP_PORT
ITSM_SMTP_AUTH
ITSM_SMTP_LOGIN
ITSM_SMTP_PASSWORD
ITSM_SMTP_FROM
ITSM_SMTP_FROM_NAME
ITSM_SMTP_SECURE- Docker Compose page — check service operation status, restart containers, pull / update images, and read docker logs
- /dev (housekeeping) page — read application logs, access Kibana, and run docker inspect
-
Problem: server data consumes lot of disk space (/var/lib/docker/overlay2)
Suggestion: Try to cleanup old docker images.
Every on-premise update pull several new images and keep both old and new onesCommand
docker image prune -af -
Problem: server data consumes lot of disk space (/opt/itsm/elk)
Suggestion: Try to cleanup old elasticsearch indexes
On-premise provided with built-in elasticsearch management system kibana
Follow kibana setup guide to setup it
Remove indexes with kibana GUI -
Problem: EM CCS clients updates consume lot of internet traffic
Suggestion: Setup local antivirus database updates
On-premise provided with av-db offline package
Follow antivirus local updates guide to setup CCS update preferences